从CNCF基金会的成立,到Kubernetes社区蓬勃发展,历经6载,17年异军突起,在mesos、swarm等项目角逐中,拔得头筹,继而一统容器编排,其成功的关键原因可概括为以下几点:
项目领导者们的坚守与远见
社区的良好的运作与社区文化
社区与企业落地的正反馈
今天zouyee为大家带来《一文搞懂Kubernetes网络策略》,其中《kuberneter调度由浅入深:框架》正在编写中,敬请期待,当前涉及版本均为1.20.+。
一、Network Policy简介 随着微服务架构的日渐盛行,Serverless框架的逐步落地,应用上云后带来了模块间网络调用需求的大规模增长,Kubernetes 自 1.3 引入了 Network Policy,其提供以应用为中心, 基于策略的网络控制,用于隔离应用以减少攻击面。
Pod之间能否通信可通过如下三种组合进行确认:
其他被允许的 Pods(例如:Pod 无法限制对自身的访问)
被允许访问的namespace
IP CIDR(例如:与 Pod 运行所在节点的通信总是被允许的)
在定义基于 Pod 或namespace的 NetworkPolicy 时,可以使用标签选择器来设定哪些流量可以进入或离开 Pod。同时,当创建基于 IP 的 NetworkPolicy 时,可以基于 IP CIDR 来定义策略。
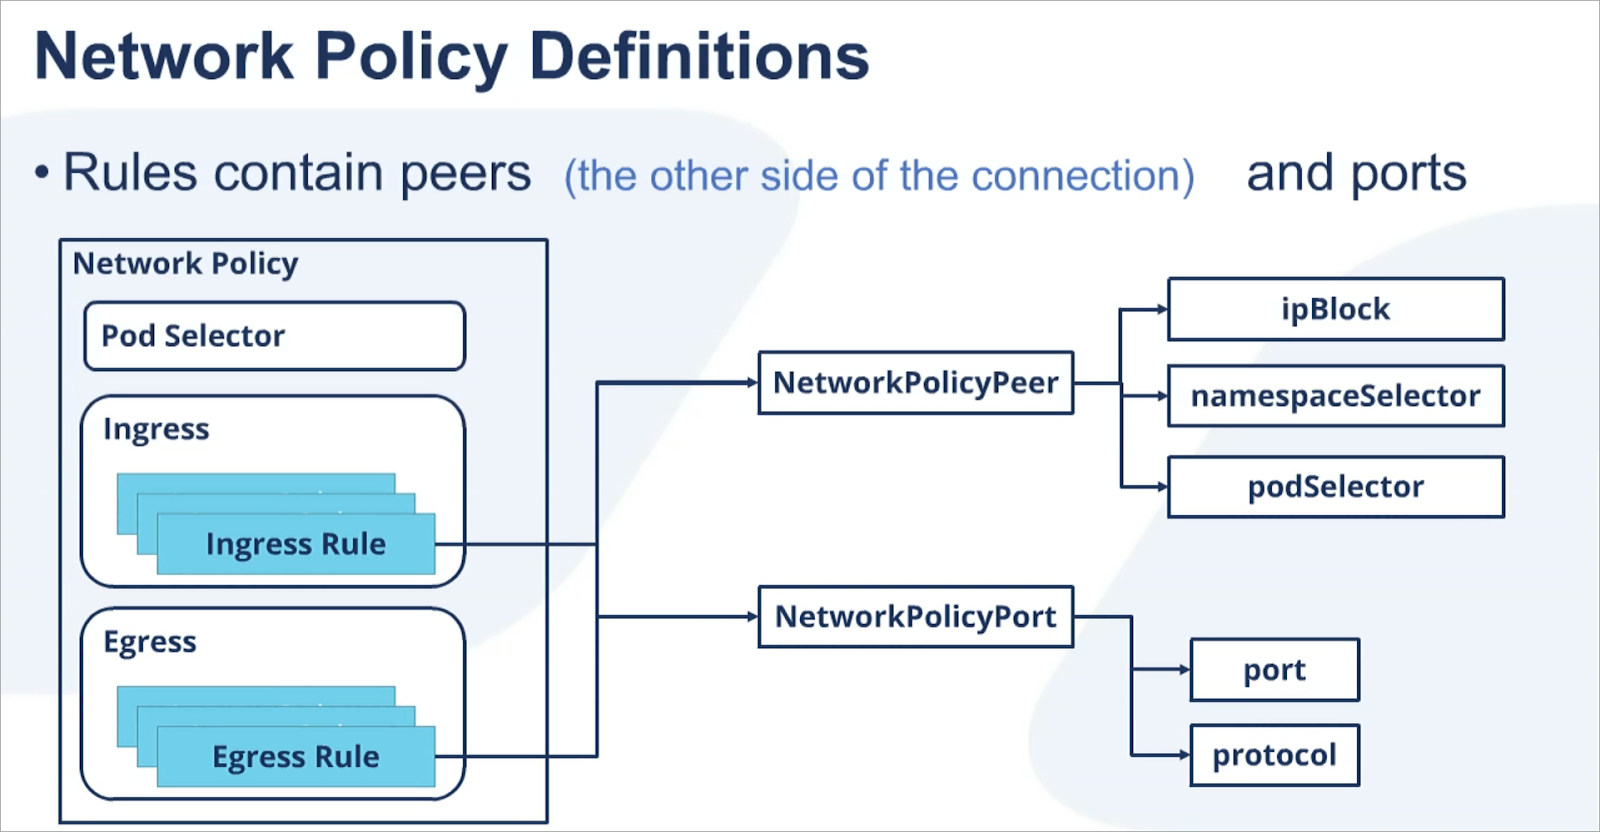
以下结构体示意图辅助理解,后面章节有具体说明:
版本变迁
Kubernetes 版本
Networking API 版本
说明
v1.5-v1.6
extensions/v1beta1
需要在kube-apiserver开启 extensions/v1beta1/networkpolicies
v1.7
networking.k8s.io/v1
v1.8
networking.k8s.io/v1
新增 Egress 和 IPBlock 的支持
二、简要介绍 默认情况下,Pod 是非隔离的,它们接受任何流量。
Pod 在被某 NetworkPolicy 选中时进入隔离状态。 一旦名字空间中有 NetworkPolicy 选择了特定的 Pod,该 Pod 会拒绝该 NetworkPolicy 所不允许的连接。 (名字空间下其他未被 NetworkPolicy 所选择的 Pod 会继续接受所有的流量)
网络策略不会冲突
⚠️在使用 Network Policy 时,网络插件需要支持 Network Policy,如 Calico、Romana、Weave Net 和 Trireme 等,其中Engress为 出口流量,Ingress为 入口流量。
2.1 结构体说明 staging/src/k8s.io/api/networking/v1/types.go
下面是 NetworkPolicy 的一个示例,如需完整说明,可参看结构定义文档:
1
2
3
4
5
6
7
8
9
10
11
12
13
14
15
16
17
18
19
20
21
22
23
24
25
26
27
28
29
30
31
32
33
34
apiVersion: networking.k8s.io/v1 kind: NetworkPolicy metadata: name: network-policy-sample namespace: default spec: podSelector: matchLabels: role: db policyTypes: - Ingress - Egress ingress: - from: - ipBlock: cidr: 172.17 .0 .0 /16 except: - 172.17 .1 .0 /24 - namespaceSelector: matchLabels: project: myproject - podSelector: matchLabels: role: frontend ports: - protocol: TCP port: 6379 egress: - to: - ipBlock: cidr: 10.0 .0 .0 /24 ports: - protocol: TCP port: 5978
必需字段 :与所有其他的 Kubernetes 对象一样,NetworkPolicy 需要 apiVersion、 kind 和 metadata 字段。
spec :NetworkPolicy 规约 中包含了在名字空间中定义特定网络策略所需的所有信息。
podSelector :每个 NetworkPolicy 都包括一个 podSelector,它选择适用该该策略的 Pod。示例中的策略选择带有 “role=db” 标签的 Pod。 若podSelector为空的,则选择名字空间下所有 Pod。
policyTypes : 每个 NetworkPolicy 都包含一个 policyTypes 列表,其中包含 Ingress 或 Egress 或(两者亦可)。policyTypes 字段表示给定的策略是应用于 所选 Pod 的入口流量还是来出口流量(两者亦可)。 如果 NetworkPolicy 未指定 policyTypes 则默认情况下始终设置 Ingress; 如果 NetworkPolicy 有任何出口规则的话则设置 Egress。
ingress : 每个 NetworkPolicy 可包含一个 ingress 规则的白名单列表。 每个规则都允许同时匹配 from 和 ports 部分的流量。示例策略中包含一条 简单的规则: 它匹配某个特定端口,第一个通过 ipBlock 指定,第二个通过 namespaceSelector 指定,第三个通过 podSelector 指定。
egress : 每个 NetworkPolicy 可包含一个 egress 规则的白名单列表。 每个规则都允许匹配 to 和 port 部分的流量。该示例策略包含一条规则, 该规则指定端口上的流量匹配到 10.0.0.0/24 中的任何目的地。
该网络策略总结如下:
隔离 default名字空间下 role=db 的 Pod 。
出口限制:允许符合以下条件的 Pod 连接到 default名字空间下标签为 role=db的所有 Pod 的 6379 TCP 端口:
default名字空间下带有 role=frontend 标签的所有 Pod带有 project=myproject 标签的所有名字空间中的 Pod
IP 地址范围为 172.17.0.0–172.17.0.255 和 172.17.2.0–172.17.255.255 (即除了 172.17.1.0/24 之外的所有 172.17.0.0/16)
入口限制:允许从带有 role=db标签的名字空间下的任何 Pod 到 CIDR 10.0.0.0/24 下 5978 TCP 端口。
2.2 简单示例 以 calico 为例看一下 Network Policy 的具体用法。
配置 kubelet 使用 CNI 网络插件(默认已经配置,无需更改)
kubelet --network-plugin=cni --cni-conf-dir=/etc/cni/net.d --cni-bin-dir=/opt/cni/bin ...
安装 calio 网络插件
1
2
3
4
# 注意修改 CIDR,需要跟 k8s pod-network-cidr 一致,默认为 192.168.0.0/16 # 当前选择的是小于50节点的安装方式,具体安装可查看 # https://docs.projectcalico.org/getting-started/kubernetes/self-managed-onprem/onpremises kubectl apply -f https://docs.projectcalico.org/manifests/calico.yaml
部署应用
部署 nginx 服务
1
2
3
4
$ kubectl create deployment nginx --image=nginx deployment "nginx" created $ kubectl expose deployment nginx --port=80 service "nginx" exposed
测试网络
1
2
3
4
5
6
7
8
9
10
11
12
13
14
15
$ kubectl get svc,pod NAME TYPE CLUSTER-IP EXTERNAL-IP PORT(S) AGE service/kubernetes ClusterIP 10.233.0.1 <none> 443/TCP 186d service/nginx ClusterIP 10.233.27.142 <none> 80/TCP 2s NAME READY STATUS RESTARTS AGE pod/nginx-f89759699-kfmbj 1/1 Running 0 62s $ kubectl run busybox --rm -ti --image=busybox /bin/sh If you don't see a command prompt, try pressing enter. / # wget --spider --timeout=1 nginx Connecting to nginx (10.233.27.142:80) remote file exists / #
4)测试网络策略
如果只让那些拥有标签 access: true 的 Pod 访问 nginx 服务, 那么可以创建一个如下所示的 NetworkPolicy 对象:
1
2
3
4
5
6
7
8
9
10
11
12
13
14
15
16
17
18
19
20
21
22
23
24
25
26
27
28
29
30
31
32
33
34
35
$ cat nginx-policy.yaml apiVersion: networking.k8s.io/v1 kind: NetworkPolicy metadata: name: access-nginx spec: podSelector: matchLabels: app: nginx ingress: - from: - podSelector: matchLabels: access: "true" $ kubectl create -f nginx-policy.yaml networkpolicy "access-nginx" created # 不带 access=true 标签的 Pod 还是无法访问 nginx 服务 $ kubectl run busybox --rm -ti --image=busybox /bin/sh If you don't see a command prompt, try pressing enter. / # wget --spider --timeout=1 nginx Connecting to nginx (10.233.27.142:80) wget: download timed out / # # 而带有 access=true 标签的 Pod 可以访问 nginx 服务 $ kubectl run busybox --rm -ti --labels="access=true" --image=busybox /bin/sh If you don't see a command prompt, try pressing enter. / # wget --spider --timeout=1 nginx Connecting to nginx (10.233.27.142:80) / #
三、应用场景 3.1 一般场景 a. 禁止访问指定服务 1 kubectl run web --image=nginx --labels app=web --expose --port 80
1
2
3
4
5
6
7
# 未有策略限制时,可以访问 $ kubectl run busybox --rm -ti --image=busybox /bin/sh If you don't see a command prompt, try pressing enter. / # wget -qO- http://web <!DOCTYPE html> <html> <head>
创建网络策略
1
2
3
4
5
6
7
8
9
10
11
12
13
# cat web-deny-all.yaml kind: NetworkPolicy apiVersion: networking.k8s.io/v1 metadata: name: web-deny-all spec: podSelector: matchLabels: app: web ingress: [] $ kubectl apply -f web-deny-all.yaml networkpolicy "web-deny-all" created
访问测试
1
2
3
4
$ kubectl run busybox --rm -ti --image=busybox /bin/sh If you don't see a command prompt, try pressing enter. / # wget -qO- --timeout=2 http://web wget: download timed out
b. 限制访问指定服务 1 kubectl run apiserver --image=nginx --labels app=bookstore,role=api --expose --port 80
创建网络策略
1
2
3
4
5
6
7
8
9
10
11
12
13
14
15
16
17
# cat api-allow.yaml kind: NetworkPolicy apiVersion: networking.k8s.io/v1 metadata: name: api-allow spec: podSelector: matchLabels: app: bookstore role: api ingress: - from: - podSelector: matchLabels: app: bookstore # kubectl apply -f api-allow.yaml networkpolicy "api-allow" created
访问测试
1
2
3
4
5
6
7
8
9
10
11
12
13
创建不加label的pod,预期结果,访问被限制 $ kubectl run busybox --rm -ti --image=busybox /bin/sh If you don't see a command prompt, try pressing enter. / # wget -qO- --timeout=2 http://apiserver wget: download timed out / # exit 创建带app=bookstore标签的pod,预期结果,访问被限制 $ kubectl run busybox --rm -ti --image=busybox --labels app=bookstore,role=frontend /bin/sh If you don't see a command prompt, try pressing enter. / # wget -qO- --timeout=2 http://apiserver <!DOCTYPE html> <html><head> / # exit
c. 放通访问限制 1 kubectl run apiserver --image=nginx --labels app=bookstore,role=api --expose --port 80
应用a中的网络策略,限制所有流量
1
2
3
4
5
6
7
8
9
10
11
12
13
# cat web-deny-all.yaml kind: NetworkPolicy apiVersion: networking.k8s.io/v1 metadata: name: web-deny-all spec: podSelector: matchLabels: app: web ingress: [] $ kubectl apply -f web-deny-all.yaml networkpolicy "web-deny-all" created
创建放通通网络策略
1
2
3
4
5
6
7
8
9
10
11
12
13
14
15
16
17
18
19
# cat web-deny-all.yaml kind: NetworkPolicy apiVersion: networking.k8s.io/v1 metadata: name: web-allow-all namespace: default spec: podSelector: matchLabels: app: web ingress: - {} $ kubectl apply -f web-allow-all.yaml networkpolicy "web-allow-all" created # 需要注意deny跟allow的细微差别就是[]与{},其中{}代表 - from: podSelector: {} namespaceSelector: {}
3.2 namespace限制 a. 禁止 namespace 中非白名单流量
创建网络策略
1
2
3
4
5
6
7
8
9
10
# cat default-deny-all.yaml kind: NetworkPolicy apiVersion: networking.k8s.io/v1 metadata: name: default-deny-all namespace: default spec: podSelector: {} ingress: [] # kubectl apply -f default-deny-all.yaml
说明:
b. 禁止其他 namespace 流量 1 2 3 kubectl create namespace secondary kubectl run web --namespace secondary --image=nginx \ --labels=app=web --expose --port 80
创建网络配置
1 2 3 4 5 6 7 8 9 10 11 kind: NetworkPolicy apiVersion: networking.k8s.io/v1 metadata: namespace: secondary name: web-deny-other-namespaces spec: podSelector: matchLabels: ingress: - from: - podSelector: {}
访问测试
1 2 3 4 5 6 7 8 9 10 11 12 # default命名空间访问 $ kubectl run busybox --rm -ti --image=busybox /bin/sh If you don't see a command prompt, try pressing enter. / # wget -qO- --timeout=2 http://web.secondary wget: download timed out / # exit # secondary命名空间访问 $ kubectl run busybox --rm -ti --image=busybox --namespace=secondary /bin/sh If you don't see a command prompt, try pressing enter. / # wget -qO- --timeout=2 http://web.secondary <!DOCTYPE html> <html>
c. 运行所有namespace流量 1 kubectl run web --image=nginx --labels app=web --expose --port 80
创建网络策略
1 2 3 4 5 6 7 8 9 10 11 12 13 14 15 # cat web-allow-all-namespaces.yaml kind: NetworkPolicy apiVersion: networking.k8s.io/v1 metadata: namespace: default name: web-allow-all-namespaces spec: podSelector: matchLabels: app: web ingress: - from: - namespaceSelector: {} # kubectl apply -f web-allow-all-namespaces.yaml # kubectl create namespace secondary
说明:
app: web网络策略应用到该标签podnamespaceSelector: {}匹配所有命名空间
访问测试
1 2 3 4 5 # kubectl run busybox --rm -ti --image=busybox --namespace=secondary /bin/sh If you don't see a command prompt, try pressing enter. / # wget -qO- --timeout=2 http://web.secondary <!DOCTYPE html> <html>
c. 指定 namespace 访问服务 1 2 3 4 5 6 # kubectl run web --image=nginx \ --labels=app=web --expose --port 80 # kubectl create namespace dev # kubectl label namespace/dev purpose=testing # kubectl create namespace prod # kubectl label namespace/prod purpose=production
创建网络策略
1
2
3
4
5
6
7
8
9
10
11
12
13
14
15
# cat web-allow-prod.yaml kind: NetworkPolicy apiVersion: networking.k8s.io/v1 metadata: name: web-allow-prod spec: podSelector: matchLabels: app: web ingress: - from: - namespaceSelector: matchLabels: purpose: production # kubectl apply -f web-allow-prod.yaml
d. 允许其他namespace的指定pod的流量 ⚠️ Kubernetes 1.11后支持podSelector 与namespaceSelector的运算符操作,同时需要网络插件支持
1 2 3 4 # kubectl run web --image=nginx \ --labels=app=web --expose --port 80 # kubectl create namespace other # kubectl create namespace other
创建网络策略
1 2 3 4 5 6 7 8 9 10 11 12 13 14 15 16 17 18 19 # cat web-allow-all-ns-monitoring.yaml kind: NetworkPolicy apiVersion: networking.k8s.io/v1 metadata: name: web-allow-all-ns-monitoring namespace: default spec: podSelector: matchLabels: app: web ingress: - from: - namespaceSelector: # 选择namespaces中带有team=operations标签的pod matchLabels: team: operations podSelector: # 选择带有type=monitoring标签的pod matchLabels: type: monitoring # kubectl apply -f web-allow-all-ns-monitoring.yaml
访问测试
1 2 3 4 5 6 7 8 9 10 11 12 13 14 15 16 17 18 19 20 21 22 23 24 25 26 27 28 29 30 kubectl run busybox --rm -ti --image=busybox /bin/sh If you don't see a command prompt, try pressing enter. / # wget -qO- --timeout=2 http://web.default wget: download timed out (访问限制) / # exit # kubectl run busybox --rm -ti --image=busybox --labels type=monitoring /bin/sh If you don't see a command prompt, try pressing enter. / # wget -qO- --timeout=2 http://web.default wget: download timed out (访问限制) # kubectl run busybox --rm -ti --image=busybox --namespace=other /bin/sh If you don't see a command prompt, try pressing enter. / # wget -qO- --timeout=2 http://web.default wget: download timed out (访问限制) # kubectl run busybox --rm -ti --image=busybox --namespace=other --labels type=monitoring /bin/sh If you don't see a command prompt, try pressing enter. / # wget -qO- --timeout=2 http://web.default <!DOCTYPE html> <html> <head> ... (允许访问)
3.3 允许外网访问服务 1 2 3 4 5 6 kubectl run web --image=nginx --labels=app=web --port 80 kubectl expose pod/web --type=LoadBalancer kubectl get svc web NAME TYPE CLUSTER-IP EXTERNAL-IP PORT(S) AGE web LoadBalancer 10.233.54.206 <pending> 80:32548/TCP 40s 直至EXTERNAL-IP分配IP为止
创建网络策略
1 2 3 4 5 6 7 8 9 10 11 12 13 14 # cat web-allow-external.yaml kind: NetworkPolicy apiVersion: networking.k8s.io/v1 metadata: name: web-allow-external spec: podSelector: matchLabels: app: web ingress: - ports: - port: 80 from: [] # kubectl apply -f web-allow-external.yaml
3.5 高级功能 a. 允许应用固定端口流量 1 2 3 4 5 6 7 8 # kubectl run busybox -ti --image=busybox --labels=app=apiserver /bin/sh If you don't see a command prompt, try pressing enter. # nohup python3 -m http.server 8001 & # nohup python3 -m http.server 5001 & # exit # kubectl create service clusterip apiserver \ --tcp 8001:8000 \ --tcp 5001:5000
创建网络策略
1 2 3 4 5 6 7 8 9 10 11 12 13 14 15 16 17 # cat api-allow-5000.yml kind: NetworkPolicy apiVersion: networking.k8s.io/v1 metadata: name: api-allow-5000 spec: podSelector: matchLabels: app: apiserver ingress: - ports: - port: 5000 from: - podSelector: matchLabels: role: monitoring # kubectl apply -f api-allow-5000.yml
访问测试
1 2 3 4 5 6 7 8 9 10 11 12 13 14 15 16 17 18 # 启动pod未携带指定label时,访问受限 # kubectl run busybox --rm -ti --image=busybox /bin/sh If you don't see a command prompt, try pressing enter. / # wget -qO- --timeout=2 http://apiserver:8001 wget: download timed out / # wget -qO- --timeout=2 http://apiserver:5001/metrics wget: download timed out # 启动pod携带指定label时,访问不受限 $ kubectl run busybox --rm -ti --image=busybox --labels=role=monitoring /bin/sh / # wget -qO- --timeout=2 http://apiserver:8001 <!DOCTYPE HTML PUBLIC "-//W3C//DTD HTML 4.01//EN" "http://www.w3.org/TR/html4/strict.dtd"> ... / # wget -qO- --timeout=2 http://apiserver:5001/ <!DOCTYPE HTML PUBLIC "-//W3C//DTD HTML 4.01//EN" "http://www.w3.org/TR/html4/strict.dtd"> ...
b. 多标签限制 说明:Network Policy定义一组微服务访问某一应用,如下述示例中,一组微服务共享redis服务
1 2 kubectl run db --image=redis:4 --port 6379 --expose \ --labels app=bookstore,role=db
以下服务共享redis服务
service
labels
searchapp=bookstore role=search
apiapp=bookstore role=api
catalogapp=inventory role=web
创建网络策略
1 2 3 4 5 6 7 8 9 10 11 12 13 14 15 16 17 18 19 20 21 22 23 24 25 # cat redis-allow-services.yaml kind: NetworkPolicy apiVersion: networking.k8s.io/v1 metadata: name: redis-allow-services spec: podSelector: matchLabels: app: bookstore role: db ingress: - from: - podSelector: matchLabels: app: bookstore role: search - podSelector: matchLabels: app: bookstore role: api - podSelector: matchLabels: app: inventory role: web # kubectl apply -f redis-allow-services.yaml
访问测试
1 2 3 4 5 6 7 8 9 10 11 12 13 $ kubectl run busybox --rm -ti --image=curl --labels=app=inventory,role=web /bin/sh / # nc -v -w 2 db 6379 db (10.233.27.143:6379) open (works) $ kubectl run busybox --rm -ti --image=curl --labels=app=other /bin/sh / # nc -v -w 2 db 6379 nc: db (10.233.27.143:6379): Operation timed out (访问受限)
3.6 控制出口流量 a. 禁止应用的出口流量 1 kubectl run web --image=nginx --labels app=web --expose --port 80
创建网络策略
1 2 3 4 5 6 7 8 9 10 11 12 13 # cat foo-deny-egress.yaml apiVersion: networking.k8s.io/v1 kind: NetworkPolicy metadata: name: foo-deny-egress spec: podSelector: matchLabels: app: foo policyTypes: - Egress egress: [] # kubectl apply -f foo-deny-egress.yaml
说明:
policyTypes: ["egress"] 该策略类型为出口流量egress: [] 策略为空说明出口流量全部禁止
b. 禁止命名空间非白名单流量 创建网络策略
1 2 3 4 5 6 7 8 9 10 11 12 # cat default-deny-all-egress.yaml kind: NetworkPolicy apiVersion: networking.k8s.io/v1 metadata: name: default-deny-all-egress namespace: default spec: policyTypes: - Egress podSelector: {} egress: [] # kubectl apply -f default-deny-all-egress.yaml
说明:
podSelector为空,说明匹配所有podegress为空数组,说明禁止所有符合podSelector的出口流量
四、NetworkPolicy 开发 实现一个支持 Network Policy 的网络扩展需要至少包含两个组件
CNI 网络插件:负责给 Pod 配置网络接口
Policy controller:监听 Network Policy 的变化,并将 Policy 应用到相应的网络接口
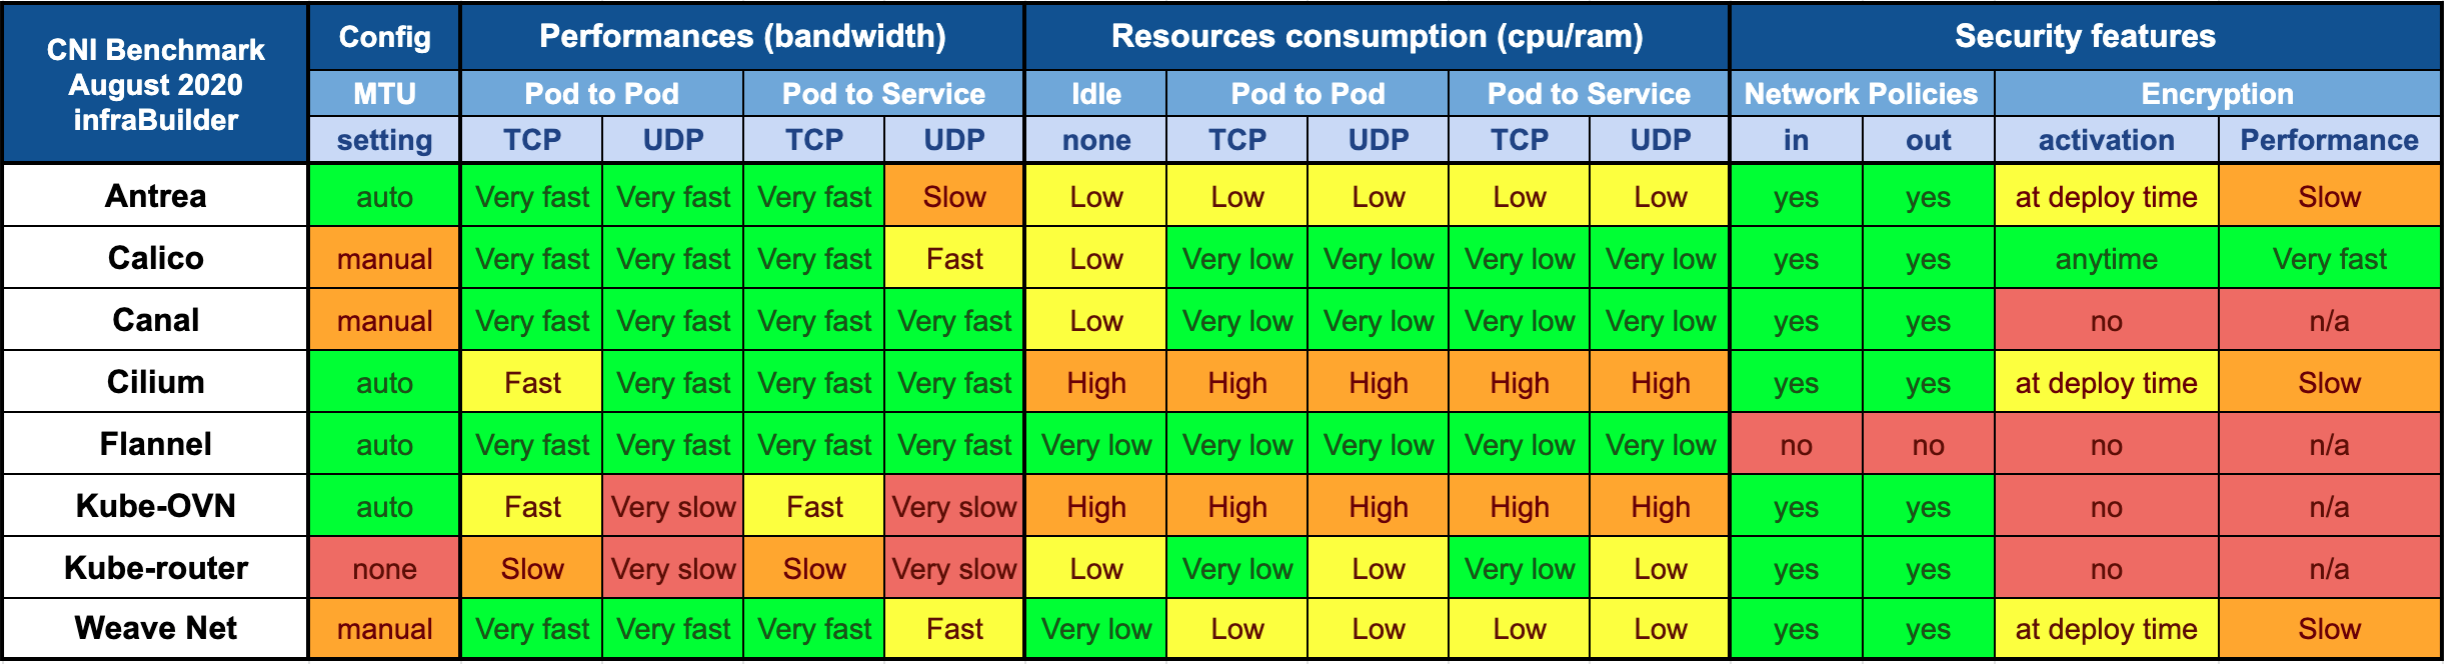
性能测试 下图基于Kubernetes 1.19版本测试了以下特性:
1)MTU auto config
2) 带宽性能: Pod to Pod、Pod to Service(TCP、UDP)
3)资源消耗: Pod to Pod、Pod to Service(TCP、UDP)
4)安全特性:Network Policies、 Encryption等
calico其他详细的能力说明,可参看官网。
五、未来展望 a. SCTP特性 支持版本: Kubernetes v1.19 [beta]
作为一个 Beta 特性,SCTP 默认是被启用的。 要在集群层面禁用 SCTP,需要为 kube-apiserver关闭特性--feature-gates=SCTPSupport=false,... 以禁用 SCTP 。 启用该特性后,用户可以将 NetworkPolicy 的 protocol 字段设置为 SCTP。
⚠️ CNI插件需要支持SCTP协议
b. 待开发 截止Kubernetes v1.20 ,NetworkPolicy API 还不支持下述功能。
强制集群内部流量经过某公用网关(可通过服务网格或其他代理来实现)
与 TLS 相关的场景(可使用服务网格或者 Ingress 控制器)
实现适用于所有名字空间或 Pods 的默认策略(如calico)
高级的策略查询或者策略验证相关工具(如calico)
在同一策略声明中选择目标端口范围的能力
生成网络安全事件日志的能力(例如,被阻塞或接收的连接请求)
禁止本地回路或指向宿主的网络流量(Pod 目前无法阻塞 localhost 访问, 它们也无法禁止来自所在节点的访问请求)。
上述需求可以通过操作系统组件(如 SELinux、OpenVSwitch、IPTables 等) 或者七层技术(Ingress 控制器、服务网格实现)及准入控制器进行功能增强,当然有兴趣的可以参考calico及OPA项目。
六、参考文档